 Intro
Intro
There are many examples online on how to create a linux vagrant box including mine. But not so much around windows boxes.
The easiest way? just shop around in Vagrant Cloud, identify a windows box, and spin it using vagrant up. That’s exactly what I did but I faced a problem after the trial period expired as I couldn’t even license it using a product key. In this blog we will showcase how to create a vagrant box based on windows 10 pro that you can activate if you have a license.
Why Create a windows vm inside a PC laptop
My VPN cuts all internet access !
My team have recently been provided VPN links to a client’s environment that cuts internet access, this made us think of a workaround to isolate that network within a Virtualbox vm which worked like a charm.To make it even faster to spin as the team grew, I decided to find vagrant boxes in Vagrant Cloud and shared the Vagrantfile with the colleagues.
- What happens when Windows evaluation period ends?
As soon as these evaluation based vagrant boxes expired, the vms started to shutdown every hour or so, which makes one’s work at risk. You don’t want your OS to shut off in a middle of a migration task :). We even bought license keys but the vms couldn’t get activated.
- Vagrant box version after another, l still faced the same issue when trying to license it.
Bottom line is those vagrant boxes had evaluation-only license, and not licensed to activate the software permanently.
Solution: Create a new vagrant box from scratch
- Note: all commands below were run in PowerShell and can be gathered in a single script.
Create a new Windows 10 virtual machine using official ISO from Microsoft (Media creation tool)
Choose low disk size (30) + lowest memory (1.5GB) +1 CPU
Other virtualbox settings
Settings > Advanced: Enable bidirectional shared clipboard and drag-drop support.
Settings > System > Motherboard: Disable Floppy boot.
Settings > Audio: Disable audio.
Settings > USB: Disable USB (after setting pointing device to PS/2)

Settings > Display: Enable remote display.
Add a second Network adapter as “Host only adapter”
STEPS
CREATE THE VIRTUAL MACHINE
INSTALL WINDOWS
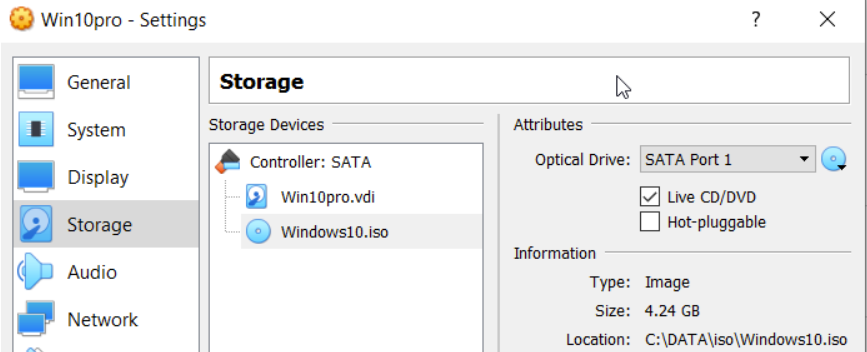
Insert the iso in the storage section
You will be prompted to sign into your Microsoft account, again skip this.
After the OS is install is finished, install VirtualBox Guest additions package on the vm (optional)
Create a local admin: vagrant /password: vagrant (during or after installation)
net user vagrant vagrant /add /expires:never
net localgroup administrators vagrant /add
Make sure the network you are connected to is private.Run the below cmd
Set-NetConnectionProfile -NetworkCategory Private
PS C:\Windows\system32> Get-NetConnectionProfile
Name             : Network
InterfaceAlias   : Ethernet
InterfaceIndex   : 6
NetworkCategory  : Private  <-----
IPv4Connectivity : Internet
IPv6Connectivity : NoTraffic
PREPARE WINDOWS FOR VAGRANT
Base Windows Configuration
- Turn off UAC: run as admin in cmd prompt ( in one line)
reg add HKEY_LOCAL_MACHINE\Software\Microsoft\Windows\CurrentVersion\Policies\System /v EnableLUA /d 0 /t REG_DWORD /f /reg:64
winrm quickconfig -q
winrm set winrm/config/winrs '@{MaxMemoryPerShellMB="512"}'
winrm set winrm/config '@{MaxTimeoutms="1800000"}'
winrm set winrm/config/service '@{AllowUnencrypted="true"}'
winrm set winrm/config/service/auth '@{Basic="true"}'
Set-Service  WinRM -StartupType "Automatic"
Start-Service WinRM
Note- WinRm is the alternative to ssh for windows boxes which allows vagrant to connect to the box.
- Relax the Powershell execution policy (run in powershell as admin)
Set-ExecutionPolicy Unrestricted -Force
- Enable remote connection to your box
Set-ItemProperty -Path 'HKLM:\System\CurrentControlSet\Control\Terminal Server' -name "fDenyTSConnections" -value 0 Enable-NetFirewallRule -DisplayGroup "Remote Desktop"
secedit /export /cfg c:\secpol.cfg (gc C:\secpol.cfg).replace("PasswordComplexity = 1", "PasswordComplexity = 0") | Out-File C:\secpol.cfg secedit /configure /db c:\windows\security\local.sdb /cfg c:\secpol.cfg /areas SECURITYPOLICY rm -force c:\secpol.cfg -confirm:$false
if ( -Not (Test-Path 'registry::HKEY_LOCAL_MACHINE\SOFTWARE\Policies\Microsoft\Windows NT\Reliability')) { New-Item -Path 'registry::HKEY_LOCAL_MACHINE\SOFTWARE\Policies\Microsoft\Windows NT' -Name Reliability -Force } Set-ItemProperty -Path 'registry::HKEY_LOCAL_MACHINE\SOFTWARE\Policies\Microsoft\Windows NT\Reliability' -Name ShutdownReasonOn -Value 0
- Optional: Clean unused files and zero free space on C drive (Optional)
C:\Windows\System32\cleanmgr.exe /d c:
- Optional: Download and run sldete to zero out free space
PS C:\> sdelete.exe -z c:
- Optional: allow PowerShell to display a progress bar when using the WinSSH communicator.
 if (!(Test-Path -Path $PROFILE)) {
  New-Item -ItemType File -Path $PROFILE -Force
}

Add-Content $PROFILE '$ProgressPreference = "SilentlyContinue"'
EXPORTING YOUR BASE BOX
Create a new Vagrantfile with some default settings that will allow your users and Vagrant to connect to the box
# -*- mode: ruby -*-
# vi: set ft=ruby :
# All Vagrant configuration is done below. The "2" in Vagrant.configure
# configures the configuration version (for backwards compatibility).
Vagrant.configure(2) do |config|
config.vm.guest = :windows
config.vm.communicator = "winrm"
config.vm.boot_timeout = 600
config.vm.graceful_halt_timeout = 600
# Create a forwarded port mapping which allows access to a specific port
# within the machine from a port on the host machine.
config.vm.network "forwarded_port", guest: 80, host: 8080
config.vm.network :forwarded_port, guest: 3389, host: 3389
config.vm.network :forwarded_port, guest: 5985, host: 5985, id: "winrm", auto_correct: true
config.vm.provider "virtualbox" do |vb|
#  Customize the name of VM in VirtualBox manager UI:
 vb.name = "win10_pro_vm"
 end
end
Export the virtualbox as vagrant box ( make sure your CDV drive is empty)
vagrant package --base Win10Pro --output /path/to/output/Win10Pro.box --vagrantfile /path/to/initial/Vagrantfile
Add the box to vagrant repo you name it as you wish
vagrant box add /path/to/output/Win10Pro.box --name brokedba/Win10pro
Add winrm-fs and vbguest in your physical host to allow shared folders syncing and auto-install of Vbox Guest additions package (if not done on the base box)
vagrant plugin install winrm-fs
vagrant plugin install vagrant-vbguest
Test the vagrant box
Yay!! you now have the box registered locally and ready to bounce
C:\> vagrant init
C:\> vagrant up
C:\> vagrant destroy  --- to destroy the vm
Test this vagrant box online
If you want to spin this vagrant box without the hassle of creating the vagrant box , you can try mine already as It’s already stored in vagrant Cloud 
You only need to
1- download a small VagrantFile (by clicking save as) , copy it to your local directory then
2- Run the vagrant up command within the same directory
C:\> vagrant up
C:\> vagrant destroy --- to destroy the vm
Conclusion
- We have just demonstrated how to create a vagrant box for windows 10 that can be licensed later if needed.
- If you are on Linux or Mac machine and are interested in installing windows 11, there is neat article about a shell script that will automatically install the OS for you through a new Virtualbox feature called
“Unattended install” >> Unattened-install-microsoft-windows-11-on-virtualbox
No comments:
Post a Comment